Upgrading to Common Ground v3.0
Upgrading your instance of Common Ground to version 3.0 consists of installing the package, running a script, performing a few manual steps, and verifying the upgrade. The entire process should take approximately one hour. During this time, users should log out of Common Ground and refrain from using it until the process is complete. If users are logged in to the system during the upgrade, they may experience unexpected results, but it will not cause the upgrade to fail or other long-term problems.
Common Ground strongly recommends that you read the following instructions entirely before you start the upgrade process so you know what to expect. You must perform these steps in the order they appear, and complete each step before starting the next one.
Sandbox Upgrade Testing
The Force.com platform lets you test a package install without affecting your production instance of Common Ground. Using a sandbox, you can perform a trial run of the upgrade procedure and make certain the result functions the way you expect before allowing your users access to the new features. As long as your Common Ground license is installed on an active Salesforce instance (not a trial), you can obtain a sandbox and use it to test the upgrade. For more information about sandboxes and instructions for obtaining and creating them, read the article Force.com Sandbox.
To install into your sandbox, you will use a different link than to install into your production Common Ground instance.
For Sandbox Installation ONLY, use this link instead of the link in Step 1 below:
https://test.salesforce.com/?startURL=%2Fpackaging%2FinstallPackage.apexp%3Fp0%3D04t40000000HSdY
Prerequisites for Upgrading Common Ground
You must meet the following requirements in order to upgrade to Common Ground v3.0:
- You must have Common Ground v2.5 or later installed. To
check your current version of Common Ground, look under the
Quick Help section of the left sidebar in Common Ground. The
current version number is displayed at the bottom of the section.
If you do not yet have Common Ground version 2.5, you must upgrade to v2.5 before continuing this upgrade.
- Your user profile must be "System Administrator." All the steps in this document assume that you are logged in as the administrator for your instance of Common Ground. If you have multiple credentials you use to log in to Common Ground, you must use your administrator credentials when performing the upgrade.
- Users should not be affiliated with the "Standard User" profile. The following section provides a procedure to perform this verification.
Verify users are not affiliated with the "Standard User" profile
Note: If you are successfully running Common Ground 2.5, you have already made this change and can skip this step. If you are running an earlier version of Common Ground, you must complete this step.
Features that are new for Common Ground versions 2.5 and later will not work for any user who is using the default "Standard User" profile. Because it is difficult to fix this problem after you have installed the version 3.0 package, Convio strongly recommends you go to the User Profiles page now and verify you have no users affiliated with the "Standard User" profile. If any users are affiliated with the "Standard User" profile, you must create a custom profile and update these users so they are assigned your custom profile.
Complete the following instructions to determine whether you have users affiliated with the Standard User profile.
- Click Setup.
- Under Administration Setup in the left sidebar, click Manage Users to expand the list.
- From the Manage Users list, click Profiles to display the User Profiles page.
- From the Profile list, click the Standard User link to display the profile.
- In the Profile Detail section, click the View Users button. This list will show you all the users, active and inactive, who are affiliated with the "Standard User" profile. If there are no active users affiliated with the "Standard User" profile, you do not need to create a custom profile and can proceed directly to the Installing the Common Ground v3.0 Package section.
If any users are affiliated with the "Standard User" profile, you must follow the procedure in the next section.
Create a custom profile and update standard users
You must create a custom profile for any users affiliated with the "Standard User" profile and update the users so they are affiliated with the new profile. The next two sections will help you with this procedure.
Complete the following steps to create a custom profile:
- Click Setup.
- Under Administration Setup in the left sidebar, click Manage Users to expand the list.
- From the Manage Users list, click Profiles to display the User Profiles page.
- Click the New button to display the Clone Profile page.
- You must clone an existing profile to create the new profile. Select Standard User from the Existing Profile drop-down list.
- Enter a name for your new profile in the Profile Name text box, such as CG Standard User.
- Click the Save button.
Complete the following steps to update your users with the new custom profile:
- Click Setup.
- Under Administration Setup in the left sidebar, click Manage Users to expand the list.
- From the Manage Users list, click Users to display the All Users page.
- From the View drop-down list, select Active Users. The page will update to show a list of all current active users and the affiliated profile for each user. Click Profile in the header row of the table to sort the list by profile type.
- For each active user affiliated with the "Standard User" profile, click the Edit link to the left of the username, then select the new profile you created from the Profile drop-down list. Click the Save button after updating each user to return to the Active Users page.
- Continue these steps until all the active users who are affiliated with the "Standard User" profile have been updated with the new custom profile.
You can now proceed to Installing the Common Ground v3.0 Package.
Part 1: Installing the Common Ground v3.0 Package
Before you begin the installation process, notify your users that you are upgrading Common Ground and request that they log out of the system and stay logged out until you have completed the upgrade. If users are logged in before the upgrade is complete, they may experience unexpected results.
The following procedures have been divided into several steps for ease of use. Complete every step, and the procedures within the steps, in order.
Pre-Install: Review the upgrade summary
- Follow this link:
https://login.salesforce.com/?startURL=%2Fpackaging%2FinstallPackage.apexp%3Fp0%3D04t40000000HSdY
The standard Common Ground login page will display. - Log in using your administrator username and password.
The first screen in the force.com package installer will display.
Note: The pages in the package installer will load much more slowly than Common Ground usually loads. This is normal behavior. - You will see information about the package to be installed
and the currently installed versions. Under Package Upgrade
Details, the Version Name should be 3.0.
Under Installed Version Information, the Description should
be Convio Common Ground version
2.5, as shown in the following screenshot.
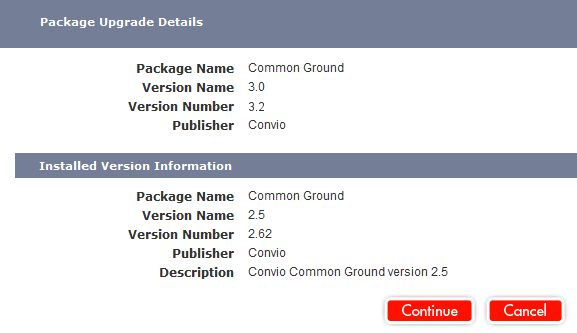
Note: Under Package Upgrade Details, the Version Number might read a different 3.x number. That is expected.
- Scroll down the page to review the Package Components section, which contains a detailed list of components that will be updated and a brief summary of what will be done to each item. After you have reviewed the pending changes, click Continue. The Approve Third Party Access pop-up window will display.
Pre-Install: Approve third-party access
You must grant access to third-party websites to send or receive data to/from Common Ground in order for Common Ground v3.0 to work accurately.
The Approve Third-Party Access pop-up window will display a list of websites, as shown in the following screenshot:
- www.cgupgrade.com
- secure2.convio.net
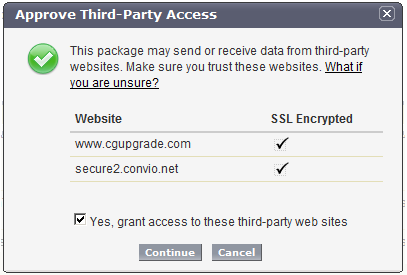
If you see any different websites on the list, contact Support to ensure that only trusted websites are included.
At the bottom of the Approve Third-Party Access pop-up window, place a checkmark in the Yes, grant access to these third-party websites checkbox. Click the Continue button. The Package Installer page will display.
Step 1: Approve package API access
From the Package Installer: Common Ground page:
- Review the Package Installer page, as shown in the following
screenshot.
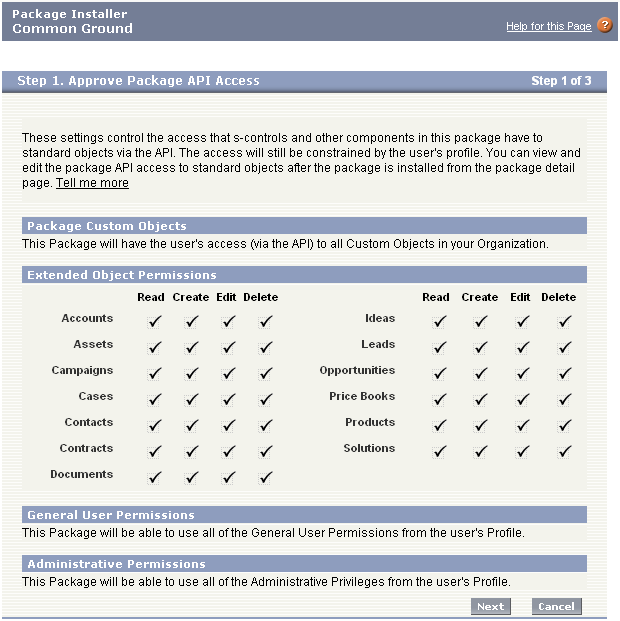
This screen allows you to review permissions that Common Ground is requesting in order to continue installing the upgrade package. Unless you have altered package API access since you originally obtained your Common Ground trial, these settings are consistent with the way your current Common Ground is functioning.
- Click the Next button to continue installing the upgrade package.
- If you do not want to grant this access to Common Ground, click the Cancel button to abort the upgrade process. This will end the upgrade process and return you to your pre-v3.0 instance of Common Ground.
For more details about API and Dynamic Apex access in packages in general, read this Salesforce help article.
Step 2: Choose security level
In this step, determine which user types will have access to Common Ground.
Warning: Features that are new for Common Ground 2.5 or later will not work for any user who is using the default "Standard User" profile. Before you complete this step, you must verify that no users are affiliated with the "Standard User" profile. Follow the instructions in the Prerequisites for Upgrading Common Ground section earlier in this document. Convio strongly recommends that you not continue the upgrade process if any users are affiliated with the "Standard User" profile.
Recommended Settings: The Select security settings option allows you to choose the usage access for all existing custom and standard profiles in your organization at installation time. You can set each profile to have appropriate access. Again, this process sets access to Common Ground objects and field-level security. Click the Next button after making your selection.
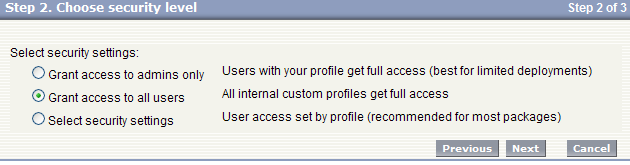
Advanced Settings: If you want only administrative users to have access to Common Ground, be aware that the Admin access only option will give Common Ground object permissions, sets field-level security to visible and editable to all fields specific to Common Ground to administrators and any profile with the Customize Application permission only. Unless you are very familiar with customizing profiles, selecting this option is not recommended.
Step 3: Install package
Click the checkbox next to Ignore Apex test failures that may cause the installed application not to function properly. This checkbox must contain a checkmark, as shown in the following screenshot, or Common Ground v3.0 will fail to install.
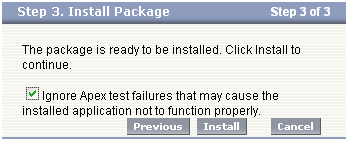
Note: Why ignore test failures? During installation, all dependencies on other packages are checked and verified, and all unit tests are run. Common Ground contains many components that are initially installed as inactive and later activated. Many of the unit tests require those inactive components to pass, and so will appear to the package installer to fail and will forcibly halt the installation even though everything is behaving as expected and is successful. If you forget to check this box, it could mean a significant delay in the upgrade process and the cause behind the delay might not be immediately apparent.
After you've checked the checkbox, click the Install button. The package installer will begin processing your request to install Common Ground v3.0, as shown in the following screenshot.

Step 4: Verify successful package installation
After the installation is complete, you will receive an email letting you know you may proceed. It may get caught in your junk email filters. Under ordinary circumstances, this email should arrive less than 15 minutes after you click the Install button, and will look like this:
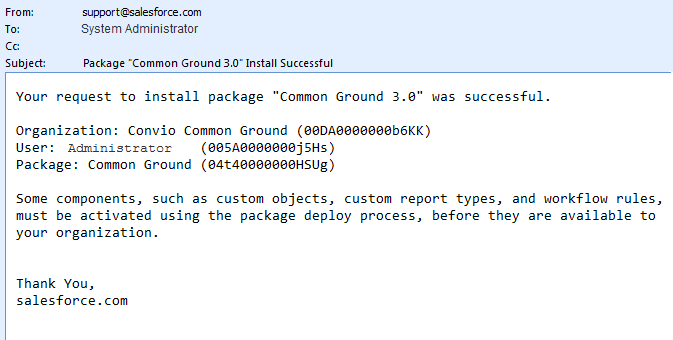
If you receive an email that states your upgrade has failed, review the error messages. If they contain the words "Assertion Failed," then the Ignore Apex Test Failures checkbox in Step 3 was left unchecked. Repeat the upgrade process and be sure a checkmark is in the checkbox.
If your messages include "These users will not have access to new Common Ground features due to their profile settings," then one or more of your users is associated with the default standard profile. You must assign these users to a custom profile, probably a custom Standard User profile, if you want them to be able to use the new features in Common Ground 3.0.
If you still have not received an email message after about 15 minutes, check to see that the package has been upgraded directly in your Common Ground instance.
To verify that the package has successfully been installed, look under the Quick Help section of the left sidebar in Common Ground. The current version number is displayed at the bottom of the section. The version number should now be 3.0.
If the version number is not 3.0,
try waiting a few minutes and reloading the page. You may need
to start over and repeat the instructions in Part
1: Installing the Common Ground v3.0 Package. Repeating
the package installation following the Part 1 instructions will
not cause any problems. If the installation continues to be unsuccessful,
contact Convio
Common Ground Support.
After the package has been upgraded, proceed to Part
2: Running the Upgrade Tool.
Part 2: Running the Upgrade Tool
The Convio Common Ground team has developed an upgrade tool to execute tasks associated with the upgrade process.
Complete the following steps to run the upgrade tool.
- While logged in to Common Ground as a System Administrator, click the Utilities tab.
- Under the Upgrade Tools
section, click the Common
Ground v3.0 Upgrade Tool link, as shown in the
following screenshot.

- The Common Ground Upgrade window will open, as shown in
the following screenshot. Click the Apply
Changes button.
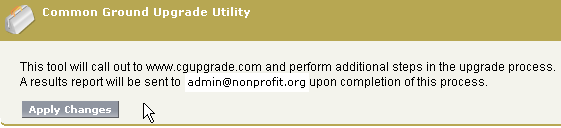
A dialog box will appear to confirm that you want to continue the upgrade. Click the OK button to continue the process and close the dialog box. - The Common Ground Upgrade Utility window will briefly display
an animated "Working" icon, followed by this message:

Important: Do not log out of Common Ground until the upgrade tool completes, although you can close the Common Ground Upgrade Utility window. The upgrade tool will use your current session ID, and if that ID ceases to be valid, parts of the upgrade might fail.
- Check your email. When the upgrade tool finishes processing,
you will receive an email message with the results, as shown
in the following screenshot.
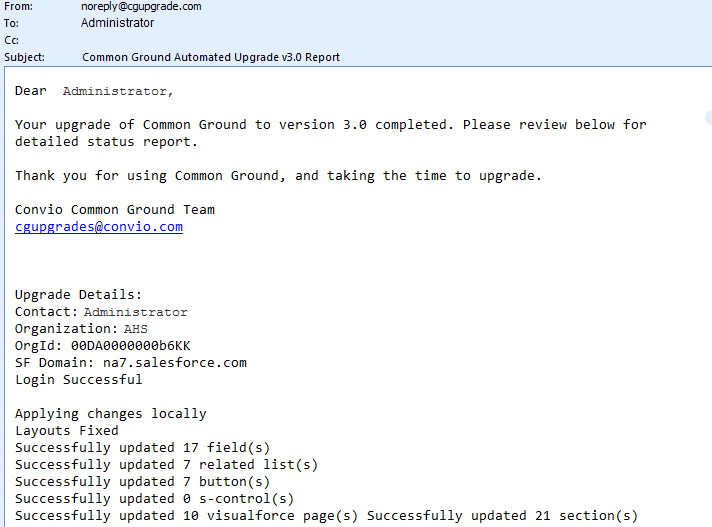
The above screenshot is an excerpt of the email message you will receive if the upgrade tool is successful. If you receive this email, it is safe to continue to the manual configuration steps.
If your email message begins with the text, "Your upgrade of Common Ground to version 3.0 had errors that require your attention," you can either run the process again, or review the list of errors in the message and correct any you find. If you continue to encounter problems, contact Common Ground Support.
Part 3: Optional Changes
You can make the following optional changes to Common Ground, either as part of the upgrade process or at a later time.
Enable new user interface theme
You can upgrade the Salesforce.com user interface to the most up-to-date version.
- Click the Setup link at the top of any Common Ground page to display the Setup page with links in the left sidebar.
- From the left sidebar, click the Customize link under the App Setup section to expand it.
- At the bottom of the Customize list, click the User Interface link to display the User Interface page.
- Place a checkmark in the Enable New User Interface Theme checkbox, in the first section of options on the page.
- Scroll to the bottom of the page and click the Save button. The latest version of the Salesforce.com user interface will be integrated into your version of Common Ground.
Enable Batch Entry v3.0
Common Ground 3.0 introduces a new version of the tool used for batch gift entry. If you are upgrading to Common Ground v3.0, the version of Batch Entry you used previously, known as Batch Entry 1.0, is enabled by default. However, you can switch to using the new version if you prefer.
If your organization is using Batch Entry 1.0 and would like
to upgrade to Batch Entry 3.0, complete the following steps.
- Click the Setup link at the top of any Common Ground page to display the Setup page with links in the left sidebar.
- From the left sidebar, click the Develop link under the App Setup section to expand it.
- Under the Develop section, click the Custom Settings link to display the Custom Settings page.
- From the list at the bottom of the page, click the Manage link next to the Common Ground Settings listing. This displays the CG_Settings page.
- Click the Edit button.
- Remove the checkmark from the Use Classic Batch Entry Tool checkbox.
- Click the Save button.
You also can use this checkbox to revert to Batch Entry 1.0 if you prefer that interface over 3.0. However, bear in mind that batches you create in 3.0 will not work in 1.0, if you decide to revert.
Your Upgrade is Complete
Congratulations! Once you have completed these steps, you have successfully upgraded Common Ground to v3.0. You may notify your users that they may log back into the system, resume work, and begin taking advantage of the new features. Remember to click the Resource Center tab for updated reference materials, user guides and other supporting resources.